In the previous short article about installing Nextcloud I did not provide much details, apart from port configuration (that might even be needed depending on other factors). The setup I chose just worked. However, I too found the basic SQLite database performance a little bit lacking and decided to use a PostgreSQL database instead, as a fresh install.
For a PostgreSQL under docker-compose I've used the same steps described in my guide for installing Mastodon with docker-compose. It works there, I do not understand the drawbacks yet, so why come up with something wildly different? Here's a condensed list of steps, explanations are in the above link.
Step 1. Download a repository
cd /home/user
git clone https://github.com/onlyoffice/docker-onlyoffice-nextcloud
mv docker-onlyoffice-nextcloud nextcloud
cd nextcloud
The name of a directory would matter later, I prefer just a short
nextcloud.
Step 2. Prepare a database container
sudo docker pull postgres:12.5-alpine

sudo docker run --name postgres12 \
  -v /YOUR/NEXTCLOUD/LOCATION/postgres:/var/lib/postgresql/data \
  -e POSTGRES_PASSWORD=password --rm -d postgres:12.5-alpine

sudo docker exec -it postgres12 psql -U postgres
> CREATE USER nextcloud WITH PASSWORD 'password' CREATEDB;
> exit

sudo docker stop postgres12
Please choose a different password in the two commands above and adjust the
location to the one where docker-compose.yml is located.
Step 3. First start
Edit the docker-compose.yml and add the database section near the top:
db:
  restart: always
  image: postgres:12.5-alpine
  shm_size: 256mb
  healthcheck:
    test: ["CMD", "pg_isready", "-U", "postgres"]
  volumes:
    - ./postgres:/var/lib/postgresql/data
The volume path above has to be the same as the one in the docker run
above, although a relative one like here serves well. Also, make the app
service depend on the db service:
app:
  # contaner_name: app-server
  # ...
  depends_on:
    - db
With the docker-compose.yml ready, start the script:
sudo docker-compose up -d
Step 4. Setup a reverse proxy
Set up a reverse proxy, however you see fit. Again, inspirations can be found in the posts under tags Nginx and especially acme.sh. The important bit is the exposed HTTP port 80, a line 37 in the source code example. This is what I was surprised about in the post Reverse proxy behind a reverse proxy. Here a port 8081 is where the Nextcloud is listening.
Step 5. Choose a PostgreSQL database
Access the site, fill in the admin username and password. Do not change the Data folder path. Then choose a PostgreSQL database and fill the following:
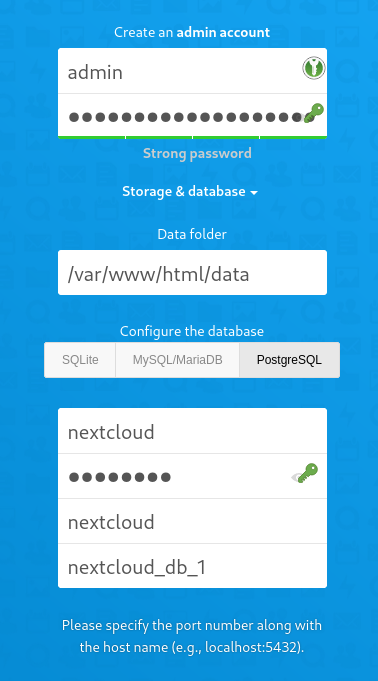
Here, the same input data in the table, in case the picture is unreadable:
| Field | Value |
|---|---|
| User | nextcloud |
| Password | password |
| Database name | nextcloud |
| Host name | nextcloud_db_1 |
Then click "Finish" at the bottom.
Step 6. Configure OnlyOffice
The last step is to setup the OnlyOffice, which to me
already proved to be a very useful tool
overall. Run the set_configuration.sh script from the repository:
sudo set_configuration.sh
Now setup the reverse proxy and access the web interface.
Upgrading
I was able to upgrade the stack by simply doing the following:
docker-compose pull
And then restart the composition:
docker-compose down && docker-compose up -d
Enjoy!