A minimal set of commands I had to do to successfully run Mastodon via docker-compose on the VPS. Many OS specific configurations are omitted, as I decided to use Arch on this VPS as well, which is not what most people choose for their server environment, at least not when caveats of such choice play a major role.
Getting started
Clone the Mastodon repository. It contains a docker-compose.yml file as
well as other files directly or indirectly referenced by it (for example
package.json or yarn.lock):
git clone https://github.com/mastodon/mastodon.git
cd mastodon
Now here's what I occasionally do to help me keep track of the changes to
the configuration files easily. Make a branch on a given tag, which at the
time of writing was v3.4.1:
git checkout v3.4.1 -b v3.4.1-branch
Without creating a branch, the HEAD would be in a detached state (pointing at a tagged commit, not a branch), It would still track changes, but these would not be accessible after another checkout.
Tip: to
get the latest available tag easily,
you can use git rev-list as follows:
git fetch --all --tags
git describe --tags `git rev-list --tags --max-count=1`
Also consider changing the mastodon image to some tagged version. In the
section web replace mastodon:latest image with the tagged one:
image: tootsuite/mastodon:v3.4.1
It is useful for referencing and searching for issues, should some arise, at the very least. Even more important to me is that it requires a manual intervention to bump a version number, so things won't suddenly change when the docker-compose script get restarted without you understanding why. It is overall a good practice to avoid unnecessary surprises.
Postgres database
The referenced version of postgres in the docker-compose file is
9.6-alpine. This might work, but I tested with 12.5-alpine instead and
found no problems so far, so I changes to this version under the db
section:
image: postgres:12.5-alpine
Start the container to setup the user, assuming the path to the
docker-compose file is /home/mastodon/mastodon/docker-compose.yml. If
not, modify the path so the postgres volume folder matches it. Consider
setting a custom password:
sudo docker run --name postgres12 -v /home/mastodon/mastodon/postgres:/var/lib/postgresql/data -e POSTGRES_PASSWORD=password --rm -d postgres:12.5-alpine
Create a mastodon database user, use the password from above:
sudo docker exec -it postgres12 psql -U postgres
> CREATE USER mastodon WITH PASSWORD 'password' CREATEDB;
> exit
sudo docker stop postgres12
This makes database setup complete.
Set up Mastodon
This part is a little bit tricky, as it took me the most time to figure out right:
sudo docker-compose run --rm web bundle exec rake mastodon:setup
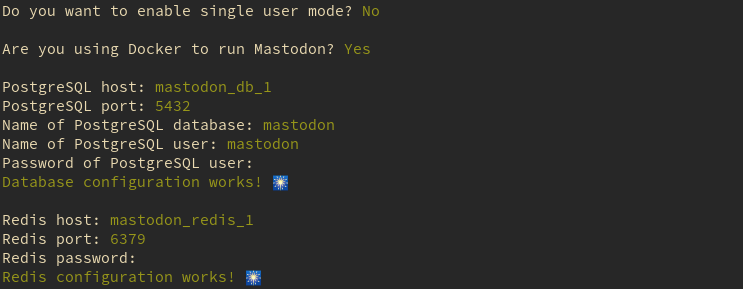
Fill the domain name you intend to run the instance. This one is probably hard to change once the instance is running. Fill the next questions according to the table below:
| Question | Type in |
|---|---|
| Do you want to enable single user mode? | No |
| Are you using Docker to run Mastodon? | Yes |
| PostgreSQL host: | mastodon_db_1 |
| PostgreSQL port: | 5432 |
| Name of PostgreSQL database: | mastodon |
| Name of PostgreSQL user: | mastodon |
| Password of ProstgreSQL user: | password |
The above part should look like this in the terminal:
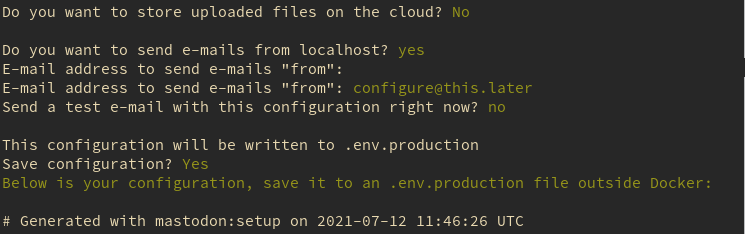
The setup then continues with email capabilities configuration questions. I am omitting details for this part, as my email provider required different SMTP settings, some of which were not offered via this setup wizard. I have not found a reliable way to send a test email from the UI or the console later, so it might be worth trying here to get the emails sent out. Setting up cloud storage or email capabilities can be also safely skipped now and configured later, if you wish to do so, use these options:
| Question | Type in |
|---|---|
| Do you want to store uploaded files on the cloud? | No |
| Do you want to send e-mails from localhost? | Yes |
| E-mail address to send e-mails "from": | Enter |
| Send a test e-mail with this configuration right now? | No |
| Save configuration? | Yes |
Your terminal should resemble this:
The terminal then outputs the configuration, including secret keys. Copy
and paste it into .env.production file in the cloned repository already
containing postgres/ directory and docker-compose.yml file, among
others.
The last part is to migrate the database and create an admin account.
Answer Yes to both and proceed. The Mastodon instance admin user
password will be generated and displayed, make sure to not lose it! If you
lose it before logging in successfully, one way to obtain it again is to
delete postgres/ folder and start over from the
Postgres database step above.
Full-text search
This step is optional, although it is a nice addition to have a full-text
search provided via ElasticSearch available. Edit the docker-compose.yml
and uncomment two es related blocks:
#  es:
#    restart: always
#    image: docker.elastic.co/elasticsearch/elasticsearch-oss:6.8.10
#    environment:
#      - "ES_JAVA_OPTS=-Xms512m -Xmx512m"
#      - "cluster.name=es-mastodon"
#      - "discovery.type=single-node"
#      - "bootstrap.memory_lock=true"
#    networks:
#      - internal_network
#    healthcheck:
#      test:
#        [
#          "CMD-SHELL",
#          "curl --silent --fail localhost:9200/_cluster/health || exit 1",
#        ]
#    volumes:
#      - ./elasticsearch:/usr/share/elasticsearch/data
#    ulimits:
#      memlock:
#        soft: -1
#        hard: -1

  web:
    build: .
    image: tootsuite/mastodon
    restart: always
    env_file: .env.production
    command: bash -c "rm -f /mastodon/tmp/pids/server.pid; bundle exec rails s -p 3000"
    networks:
      - external_network
      - internal_network
    healthcheck:
      test: ["CMD-SHELL", "wget -q --spider --proxy=off localhost:3000/health || exit 1"]
    ports:
      - "127.0.0.1:3000:3000"
    depends_on:
      - db
      - redis
#      - es
    volumes:
      - ./public/system:/mastodon/public/system
Edit .env.production file and append the following:
ES_ENABLED=true
ES_HOST=mastodon_es_1
ES_PORT=9200
The instance should now be ready to start.
First run
Start the whole stack, this can take a while:
sudo docker-compose up -d
sudo docker-compose down
This generates other files and folders, consider setting the permissions for them and start the instance again:
sudo chown -R 70:70 ./postgres
sudo chown -R 991:991 ./public
sudo chown -R 1000:1000 ./elascticsearch
sudo docker-compose up -d
Now without any modifications on docker-compose.yml the instance should
be available under the port 3000. Configure the reverse proxy of your
choice to terminate the SSL/TLS and to proxy the domain name inserted into
the wizard earlier to this port. You can also find some inspiration about
how to do so in my previous articles under tags Nginx and
especially acme.sh, should you choose to use these two to
manage this task and the certificates for you.
To access the web user interface, insert the admin user name and the password generated earlier, and you are ready to have fun in the fediverse!